You can upload certain types of files to the wiki. This is particularly useful for uploading images, which you want to place on an article, but you can also upload other types of files.
Upload a file
Using File Uploader
- Prepare the file for upload. Make sure the file is exactly as you want it.
- In the sidebar, under “tools”, click “Upload file." If you are using the mobile view, go to Special:Upload in the search bar.
- If available, leave "No" selected for upload multiple files. The default setting is No for multiple files.
- Click “Browse” next to the “Source filename:” to locate the file on your computer (the name of the “browse” button depends on your web browser).
- Change the “Destination filename:” to something descriptive, if necessary.
- Fill in the “Summary”, if necessary.
- Click the “Upload file” button.
If it is a large file, you may need to wait several seconds for the upload to complete.
Only a single file can be loaded in this method. Trying to load multiple files will only allow one to be selected.
Uploading Multiple Files With File Uploader
- Note, uploading multiple files using this method requires a gadget.
- Prepare the files for upload. Make sure the files are exactly as you want them and they are named exactly as you want them to be named after being uploaded.
- In the sidebar, under “tools”, click “Upload file." If you are using the mobile view, go to Special:Upload in the search bar.
- Click "Yes" to upload multiple files. The default setting is No for multiple files. The visual display will change slightly in several places to reflect the multiple files choice.
- Click “Browse” next to the “Source files:” to locate the files on your computer (the name of the “browse” button depends on your web browser).
- Highlight all of the wanted files to select them.
- Select the "open" button (the name of the "open" button depends on your web browser).
- You will be returned to the File Uploader screen. You will be unable to see all of the files you have selected in “Source files:”.
- Unlike single file upload, you are unable to change the “Destination filename:”. Be sure to have the files named exactly as you want them to be.
- Fill in the “Summary”, if necessary.
- Click the “Upload file” button.
- The screen will change and files will begin appearing as they upload. If the files are large files, you may need to wait several seconds for each one to complete upload.
Be aware that uploading multiple files will override any warnings that may show up with single file uploader. Duplicate files, files already named the specific name, and other warnings related to uploading will not appear. The multiple file uploader will just perform the action requested with no warning given.
Using MsUpload
- Prepare the file for upload. Make sure the file is exactly as you want it.

You probably will get a similar window, like this.
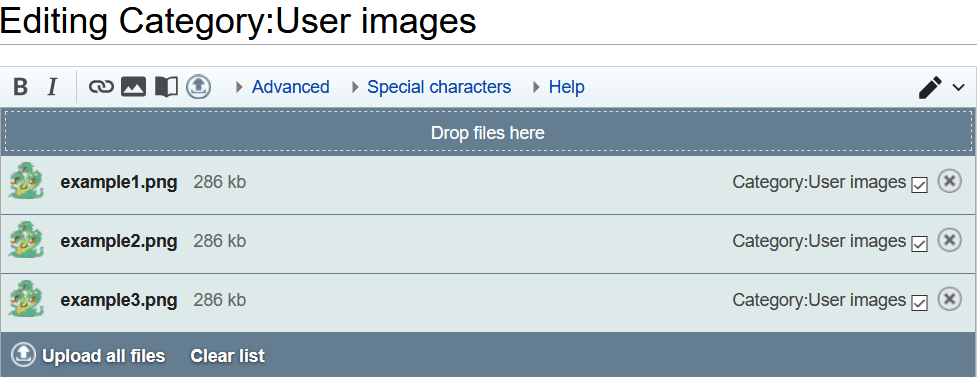
Please click to enlarge. - In the Wikitext editor, find the blue Drag and Drop space where it says “Drop files here”.
- Open up your computers file browser then click and drag the image you want onto the blue Drag and Drop space in your web browser.
- After you drop the image, you will see it appear in an image queue waiting to be uploaded. Any problems with your image will appear next to the file size (if there are any).
- Click the “Click here to upload file” link and wait for the file to upload.

An added feature of using MsUpload is that you can Drag and Drop multiple images at the same time, so that they queue to be uploaded one by one. However, organizing images on the wiki will become slightly more tedious since you can not edit the description and tags directly from the MsUpload space, like you can do with the File Uploader tool.
When uploading with the MsUpload,
you'll see a window like this.
Please click to enlarge.
Using images and file description pages

Copyright is important to add to images
After you've uploaded a file, you can use it in an article, with some special wiki syntax to create the link. See Images.
Your file gets its very own “file description page” within the File namespace of the wiki. You should edit this page to provide more information about the file. For example, many public wiki projects are quite sensitive to copyright issues, and so you should explain where you got the file from, and what its copyright status is, on the description page. Any other useful descriptive notes could also be added there.
Please look on your Wiki for Category:Templates and you should usually find there a subcategory named Copyright templates, choose the right template and add it to your images. This can become quite a tedious task when having many images to upload or using MsUpload.
For many images, it can be useful, to let AutoWikiBrowser - also called AWB - which is a bot - do this work automatically. You just need the right permissions to do this or ask an admin, if he/she can do that for you instead.
Read on here about AWB basics and advanced uses, if you are interested to learn more about this topic.
List of files in the wiki
There are a number of special pages to help you view and manage files which have been uploaded. Go to “Special pages” (in the tools on the left) and then see...
- Gallery of new files - If you just uploaded one, you will see it here.
- File list - Shows all of the files.
- Unused files - Helps you track down files which might not be needed.
- List of duplicate files - Helps you track down duplicate files based on file size and other properties.
See Special pages for details of the other information available here.